Spaghetti Squash with Grilled Tomato and Pesto Sauce
September 13, 2013
I finally got back in the kitchen to make something more interesting than my summer fat loss contest staples of salmon burgers and Fattousch Salad. This meal wasn’t really planned ahead of time, though. It basically came out of poor planning, a couple of things I bought independently, and a sample my mom sent home with me on Labor Day.
I’m a complete sucker for spaghetti squash. As much as I love pasta, I substitute spaghetti squash for it fairly often. So I bought a spaghetti squash at the store, but neglected to get any tomato products. Luckily, I had made a purchase of eight large paste tomatoes (I’m nearly certain they were San Marzanos) from Munson Farms over the weekend as well. Of course I would use some of my Chesnok Red garlic from Wee Bee Farms, because a good, bold hardneck garlic is always perfect for tomato sauce.
As I pondered my sauce, I started wondering what would happen if I threw in some of the pesto my mom made with basil from her neighbor’s garden. Hmmm…could be intriguing. Would certainly make it richer. So I had my ingredient plan. But the thought of standing in front of a hot stove on a 90 degree day while I cooked down fresh tomatoes didn’t really appeal to me. That’s what the grill is for, right? I read an article somewhere last year that said you could grill almost anything. I couldn’t remember exactly what they grilled for the article, but surely tomatoes would be fine. Plus they’d have a nice grilled flavor, which sounded great. I figured I’d peel the excess papery stuff off of a couple small heads of garlic and throw that on as well. And then I’d finish it off on the stove. (I’ve tried both roasting in the oven and microwaving, and given the HUGE amount of time it seems to take in the oven, I’m all about microwaving it these days).

Tomatoes and Garlic on the Grill
I grilled the tomatoes on a medium heat, turning them by about a quarter whenever they got charred. Total time, maybe around fifteen minutes. While they were grilling, I cut the spaghetti squash in half, scooped out the seeds, and poked the shell a bunch of times with a knife, so it would be ready to microwave.
Once sufficiently charred, I took the tomatoes and garlic off (the garlic didn’t char, but got nice and soft – perfect). Then I started microwaving the spaghetti squash (checking it after about 8 minutes, and then every couple of minutes by poking the shell with a fork), and heated about a teaspoon of olive oil in a skillet. I removed the tough core stuff around the end of the tomatoes (which were quite hot, so I pondered removing them before grilling in the future, but that might have made grilling a bit messier), and took the roasted garlic cloves out of their peels and minced them. Then I added all of it to the skillet. Since they were nice and soft, I just smashed the tomatoes with a wooden spoon.

Grilled Tomatoes and Garlic, with a Bit of Pesto
After everything was broken down fairly well, I added 4 teaspoons of pesto, and continued cooking the sauce down on medium heat until it reduced by about a third.

Grilled Tomato and Pesto Sauce Cooked Down
Once my spaghetti squash was nice and tender, I used a fork to turn it into squash pasta, then topped it with my sauce. The sauce turned out really well between the fresh tomatoes, grilled flavor, and the richness of the pesto. Not bad for non-planned!

Spaghetti Squash with Grilled Tomato and Pesto Sauce
Pseudorandom Stuff
August 11, 2013
I’ve been rather neglectful of my blog this summer, mainly due to the difficulties of eating with this body fat loss contest I’ve been doing all summer. But that’s kind of a lame excuse. I could be whipping up meals high in low-fat protein, vegetables and unrefined grains. Instead I’ve pretty much just been rotating the same stuff over and over for the past few months. My goal starting in late August is to get out of the food rut I seem to have gotten into.
But even with a mostly dull food summer, I still have a couple things to share. I went to the Farmers’ Market this weekend, and was greeted with a huge array of gorgeous heirloom tomatoes from Far Out Gardens. Every time I buy tomatoes at this stand I am nearly speechless when I eat them. They are so packed with flavor – and such a variety of flavor, at that. It always makes me wonder how these fruits can be related to the red-on-the-outside, pinkish-white-on-the-inside, flavorless orbs you find in supermarkets.
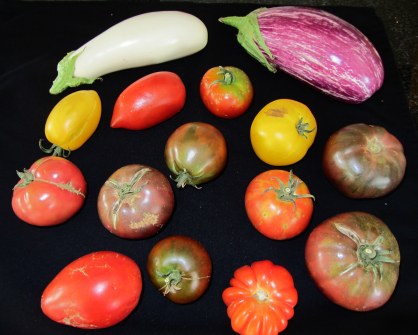
Heirloom Tomatoes and Eggplant from Far Out Gardens
On the restaurant front, I recently went to Denver’s Linger with my book club for our non-book month event. Linger is the sister restaurant to one of my all-time favorite Denver restaurants, Root Down. It features Internationally inspired small plate dishes, in a fun, eclectically decorated environment (with a killer patio on the roof as well). Only four of my book club attended, so we didn’t get to sample as many dishes as we could have with more people, but what we did have was quite delicious. The only problem I had with the restaurant was that it was too difficult to narrow down your choices from the menu – everything sounded so great!
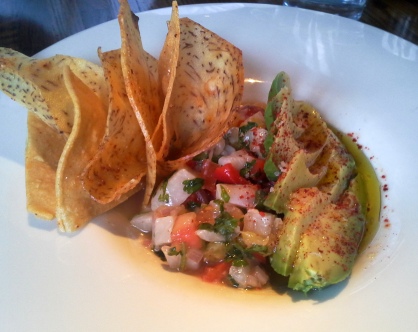
Seasonal Ceviche
We all split a lovely ceviche to start. (I’ve forgotten what kind of seasonal fish was used. Oops.)

Sesame BBQ Tacos / Kobe Short Rib, Napa Slaw, Radish, Avocado & Lime
The picture doesn’t do the tacos justice – they were quite pretty. I wasn’t absolutely in love with the first one, but by the time I got to the last one the flavors had really grown on me.
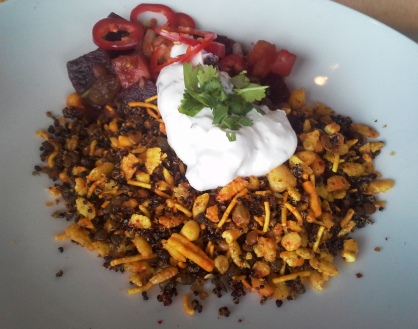
Roasted Beet Salad / Puffed Rice, Crunchy Lentil Noodles, Chickpeas, Red Onion,
Cashews, Fresnos, Cilantro, Raita, Peanuts, Tomatoes & Quinoa
Two of my dining companions got the Roasted Beet Salad, and had nothing but good things to say about it.

Ginger-Chili Shrimp / Green Papaya Salad, Scallions, Peanuts & Sesame Seeds
The Ginger-Chili Shrimp was very tasty. I probably wouldn’t have ordered it had I known it was lightly tempura-fried, but that didn’t stop me from eating all of it.
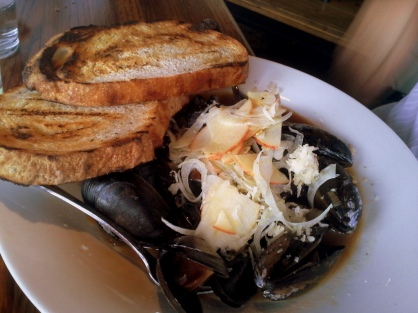
French Onion Mussels / Parmesan-Gruyère Sourdough, Gala Apples & Fennel
The French Onion Mussels were incredible. I only tasted one, but it was the single-most wonderful mussel I have ever had. Normally when you eat mussels you feel a bit of resistance when you bite into them. These mussels were so soft, they merely melted. Totally fresh tasting, no fishiness in the least. Definitely going to have to get that myself next time I go.
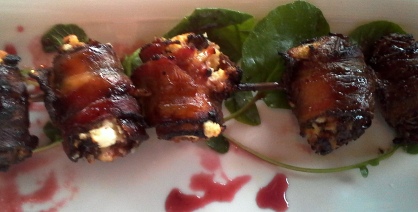
“Devils on Horseback” / Applewood Smoked Bacon Wrapped Medjool Dates, 10
Herbed Goat Cheese & Sambal Gastrique
Ah yes, the Devils on Horseback. Wow. Dangerous to your diet, but oh so worth it. Again I only tried one, but it was so full of comforting savory and sweet flavor that it was actually what I remember most about the meal.
Wholly Whole Wheat Bread (How My Sloppily Incorrect Technique Yielded Tasty Results Nonetheless)
June 28, 2013
At few weeks ago, I finally stopped and bought some whole wheat flour from Farmer John at the Farmers’ Market. Farmer John, of Butte Mill Flour Company, grows hard red winter what outside of Niwot, and stone grinds it himself. I’d been eyeing his flour for some time, but just haven’t done much yeast baking in the past few years, opting instead for the much more forgiving quick breads. But with my summer of ‘training’ for the body fat loss contest I’m doing, I’m avoiding refined flours in anything I eat at home. So the time was perfect to give his flour a try.
I decided to be really brave and just go with all whole wheat flour, something I normally wouldn’t even consider doing — there were too many whole wheat and rye flour bread attempts when I was younger that resulted in much unpleasantness. But I thought the mashed potato trick I discovered a while ago might help out, so I had a small bit of confidence in the experiment. I referenced a recipe on the King Arthur Flour site, and went from there. In addition to a mashed sweet potato, I decided to add a small bit of oat bran, flax seeds and wheat germ.

Whole Wheat Bread Ingredients (Apologies for the fogginess – pictures taken during an unplanned camera lens fingerprint phase.)
I made the first batch after a particularly tiring weight lifting workout, and had no intention of spending 15 minutes kneading bread. So I decided to see how the bread machine would do with it on the dough setting. (I planned to bake it in the oven.) The answer was, ‘interestingly’. At first the mixture was way, way too dry, so I added water during the first part of the mixing until the dough could actually move around. Then I decided that maybe it was too much water. But I decided I’d just let it run through the dough cycle and see what happened.

Totally not the right texture
Well, it was a sticky, sticky mess. So I tried to knead some flour into it. (So much for giving my arms a rest). But I discovered that whole wheat isn’t really the best kneading flour. I couldn’t get past sticky even after adding another 3/4 cup of flour. Being stubborn and wanting to stick to my no unrefined flours rule, I decided to put it back into the bread machine for another dough cycle. I don’t know why, it just seemed like something to do. (I was totally winging it at this point, obviously). I let it go through most of the cycle, but took it out just a little early, and dumped the entirely wrong-textured dough into a couple of bread pans and put it in to bake.

Still not the right texture – oh, whatever!
Amazingly, when it was done, it had a pretty nice texture, and tasted quite good. It was robust – definitely not your soft ciabatta or French bread taste or texture, but my husband and I finished both loaves off in about six days, so clearly it was good enough to warrant a repeat.

Wholly Whole Wheat Bread
I tried making a second batch the next weekend. I used slightly less flour and water, left the wheat germ out (I thought it tasted just a tiny bit too wheat germy the first time), and used butter instead of olive oil to give it a richer taste. Things went pretty much the same as the first time, except I just added the extra flour to the bread machine before the second dough cycle instead of even trying a kneading phase. I used my large loaf pan instead of making two loaves, so that I would hopefully have taller bread, but that turned out to be a mistake. It took a very long time for the bread to get anywhere close to completely baked because of its denseness. In fact, I actually ended up slicing the bread, laying the pieces on a baking sheet, and finishing it off at a lower temperature as if I were making biscotti. (Note to self – excellent Plan B for any future too-moist bread products.) I think making two shorter loaves was an unintentional wise move the first time around. But this one did taste really good.
I can’t really recommend this recipe to anyone, but should you wish to have a bit of a whole wheat adventure, here’s the amounts I used for both rounds:
Round 1:
3 c + 3/4 c stone ground whole wheat flour
11 oz sweet potato – cooked and mashed until smooth
1/4 c oat bran
2 Tbsp wheat germ
2 Tbsp flax seeds
2 Tbsp olive oil
1+1/2 c water
1 pkg yeast (mine was specially recommended for whole grains and had 25% more in the package
2 Tbsp honey
1 tsp salt
Round 2:
2 c + 1/2 c stone ground whole wheat flour
11 oz sweet potato – cooked and mashed until smooth
1/3 cup oat bran
2 Tbsp flax seeds
2 Tbsp melted butter
1+1/2 c water
1 pkg yeast (mine was specially recommended for whole grains and had 25% more in the package
1 Tbsp honey
1 tsp salt
Put all ingredients in the bread pan and run through the bread cycle. Keep an eye on it, and add additional water and assist mixing with a spatula as needed. Add the additional flour, mix it in a bit with a spatula, then run through another bread cycle. Towards the end of the second bread cycle, pre-heat oven to 350 degrees. Put dough in two bread pans brushed with olive oil, and bake about 35-40 minutes. The bread is done when it is firm and crusty on top (you can check the temperature with a thermometer as well – it should be 190 degrees).
First Day of Summer Farm Dinner at Three Leaf Farm
June 23, 2013
This past Friday my husband and I had the pleasure of attending a farm dinner at Three Leaf Farm in Lafayette. Three Leaf Farm is owned by Lenny and Sara Martinelli, owners of Three Leaf Concepts, which is responsible for an array of great restaurants in Boulder County (Leaf Vegetarian Restaurant, Aji Latin American Restaurant, the Boulder Dushanbe Teahouse, Zucca Italian Ristorante, the Huckleberry, the Naropa Cafe, and now the Chautauqua Dining Hall). The farm was established to provide local produce to the Three Leaf Concept restaurants. But the farm doesn’t just grow produce — they have several goats which provide milk for cheese, a large number of chickens for eggs, several bee hives on the property, and even a newly built barn with farm-owned as well as boarded horses.

The same six goats in several pictures. Because I think goats are adorable!
The farm tour is one of my favorite parts of farm dinners. I love hearing about the different tactics used to control weeds and pests without pesticides, and how Colorado farms deal with the dry climate. Farm manager Chase Morris shared a wealth of information as well as some pretty amusing anecdotes about the day-to-day operations at the farm. It’s always very cool to hear how passionate the farmers on smaller farms are about their product. And the chefs at each restaurant have really embraced the produce from the farm as well. I loved hearing about a day when there wasn’t enough time to harvest what the chef from Zucca wanted for that night, so he harvested it himself! And you truly can’t beat the opportunity to hold a pygmy goat! (The picture above is of one of the owners of the farm holding the goat. As soon as I got the goat into my arms, he took one look at my hair and said – hey! STRAW! – and began eating it, therefore not providing a good photographic opportunity.)

Gorgeous Appetizers
The chef for this farm dinner was Rachel Best, of Leaf Vegetarian Restaurant (one of our favorites in Boulder). The food began with some wonderful appetizers: Avalanche Lamborn Bloomers Cheese on Flax Crackers with Strawberry Rhubarb Compote, Raw Broccoli Shooters with Macademia Nut Cheese, and Raw Sweet Pea Hummus on Baby Red Romaine with Radish Sprouts. The cheese was unbelievably good and the broccoli shooters were fantastic as well.

My place at the table
After appetizers and the farm tour, we and our fellow diners moved to the table for dinner. The table was beautifully set, and there was even a trio playing live music throughout dinner. I’ve mentioned this before when reviewing various dinners we’ve gone to, but it’s always so fun to have dinner with a bunch of people you’ve never met before, to talk and laugh through dinner, and then find that three hours have gone by in what feels like half that time. The group where we sat covered a wide range of food topics, as well as the Midwest climate compared to Colorado, water rights, college majors and dining halls, and travel.

Looking down the table
But on to the food! The first course was Zucchini Fritters with Carrot-Hempseed Pesto and Pickled Golden Beets. The entire dish was great, but I couldn’t get past how awesome the pickled beets were. Yes, they seem simple, but I really think they were the best ones I’ve ever had. Very, very thin, with the perfect vinegary taste.

Zucchini Fritters with Carrot-Hempseed Pesto and Pickled Golden Beets
The bread served was Gluten Free Teff Rolls with Colorado Honey Butter. The rolls were so good that I bought some teff flour the next day to see how easy it was to bake with (haven’t tried it yet, though). I’ve actually been amazed lately with the great quality of a lot of gluten-free products I’ve tried, and these rolls were great as well.

Gluten Free Teff Rolls
The salad course was Farm Greens with Quinoa, Haystack Mountain Cracked Pepper Chevre with Basil Vinaigrette and Tempura Pearled Onion.

Farm Green Salad with Quinoa, Haystack Mountain Cracked Pepper Chevre with Basil Vinaigrette and Tempura Pearled Onion
For the main course we had Seared Trumpet Mushrooms, Turnip-Cauliflower Puree, Roasted Radishes, Sautéed Kale, and Rosemary Pistachios. I thought this course was especially attractive.

Seared Trumpet Mushrooms, Turnip-Cauliflower Puree, Roasted Radishes, Sautéed Kale, and Rosemary Pistachios
By the time dessert arrived, it was so dark that I had pretty much no hope of getting a decent picture. So you’ll have to put some imagination into viewing the picture of the Brandy Custard with Apricot Puree, Lemon Pound Cake, Toasted Almonds, and Cocoa Nibs.

Brandy Custard with Apricot Puree, Lemon Pound Cake, Toasted Almonds, and Cocoa Nibs
Three Leaf Farm has four additional dinners scheduled for this year. The price for the dinner we attended was $80, and included wine pairings for every course. This is considerably less than a lot of local farm dinners are lately, so was quite a great deal, in addition to being a wonderful time.
Duck…Duck…Eggs!
April 21, 2013
Since my first taste of a duck egg at a Farm Dinner several years ago, I’ve been searching for some to buy myself. But I had no luck up until this year’s Boulder Farmers’ Market opened. I didn’t get there early enough the first week, but I made sure to get there early enough to get some from Jodar Farms the second week!
Duck eggs are quite a bit larger than chicken eggs, as you can see from the picture below:

Duck Egg (left) v. Chicken Egg (right)
As a result, they are also higher in calories and fat, but are also quite a bit higher in cholesterol (nearly three times, in fact). So they are definitely something that I would limit in my diet (although I don’t really eat a lot of eggs anyhow, and rarely use more than one yolk per person in a serving). Nonetheless, I find duck eggs to be richer and more satisfying than chicken eggs, so definitely worth an occasional splurge!

Leeks, Green Garlic, Potatoes, Duck Egg
Once it came time to cook my first dish with duck eggs however, I found myself unusually nervous and hesitant. I realized that I hadn’t cooked eggs in any way other than scrambled or a badly formed omelet since…ever. My mom poached the eggs we had when I was younger in the handy poaching contraption, and we just didn’t do fried eggs. I did a bunch of reading on poaching, and was rather skeptical about the whole non-contraption poaching process. Dumping the egg into boiling water free-form? That sounded like a recipe for disaster. I ended up putting the egg in a ramekin and lowering it (in a rather ungainly manner) into a pot of boiling water. I had no clue how long to let it cook, so I just guess, and then pulled my slightly overdone, whites-sloppily-arrayed egg out of the water, and put it atop some caramelized leeks, green garlic, and potatoes.

Leeks, Green Garlic, and Potatoes with a Poached Duck Egg
Not bad tasting at all, but there was too much ‘stuff’ underneath the egg, so the taste of the egg really didn’t come through at all.
The next week I had planned to try poaching again, but reconsidered at the last moment and thought I’d try frying in a very small bit of butter in a non-stick pan. I did a small bit of reading, still didn’t really understand exactly what I was doing, but just went for it. I melted 1/2 Tbsp of butter in the pan over low heat, and then gently poured the egg from a small bowl into the pan. The white seemed to separate into two different levels (whatever that was about), one that cooked quickly, and one that cooked after I turned the heat up closer to medium.

Duck Egg, Sunny-Side Up (and Not Done Yet)
At that point (and we’re talking only a few minutes overall), the white seemed nice and done, but when I touched the yolk it was still cold. Okay, then – I’ll go for the hard-to-do-without-breaking-the-yolk over-easy egg! Oddly enough, I was able to flip it without breaking the yolk, let it cook another 30 seconds to a minute, and then took it out of the pan.

Duck Egg, Over-Easy
I decided to go with the simplest thing in order to really feature the egg, and just put it on top of toast. I was thrilled when I broke it open that the yolk was exactly as I like it – nice and runny (but warm). Now THAT’s the way to enjoy a duck egg!

Duck Egg, Over-Easy on Toast
g
